For those who are not familiar with the brand Anastasia Beverly Hills, it’s a brand that started off its very humble beginnings with beauty products targeted specifically to the brows. Now that the brand has been around since 1997, the founder, Anastasia, is known as The Beauty Innovator, and for good reason. She has changed the way women around the world do their makeup. When I first heard about her products, I’m not going to lie, I was a bit skeptical. I always told myself that I already had full-brows, but her products enhance what you already have, just like any other makeup product should do. Once she launched her brow salons in Beverly Hills, she started to gain in popularity with celebrities such as the Kardashians and Makeup Artists globally, she then extended her line to lipsticks, lip stains, eye shadows, and, of course, brow enhancers and definers.
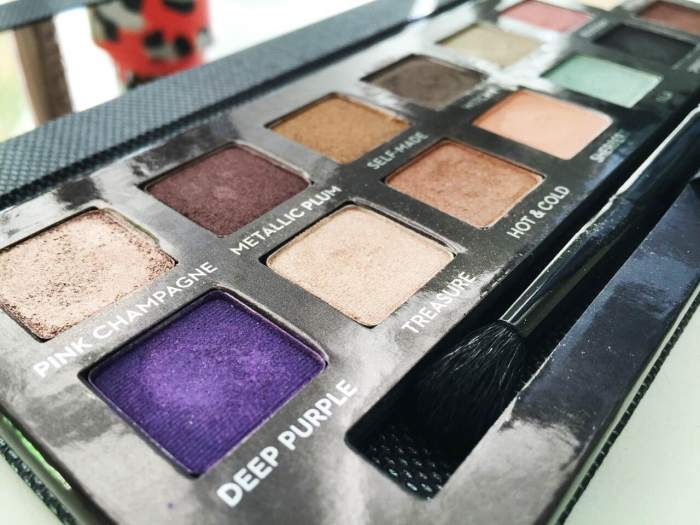
Since the beginning, there has been a few limited edition palettes that she has put out, including her most recent, the ‘Self Made’ palette; a limited edition, fashion-forward eye shadow kit. It basically is the ultimate makeup artists’ palette. It includes fourteen shades–ranging from a neutral beige to a galaxy black. The colors are unique and deliver intense opacity so that you can create an endless array of custom looks.
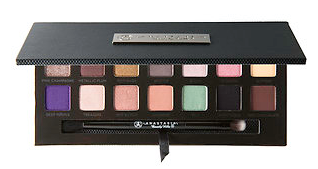
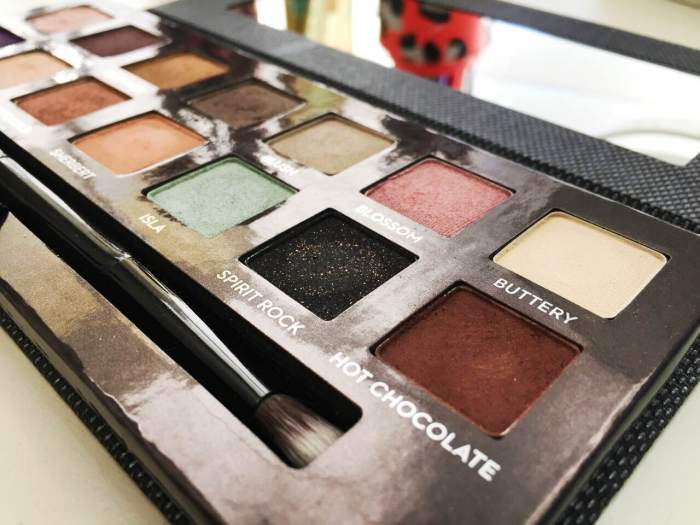
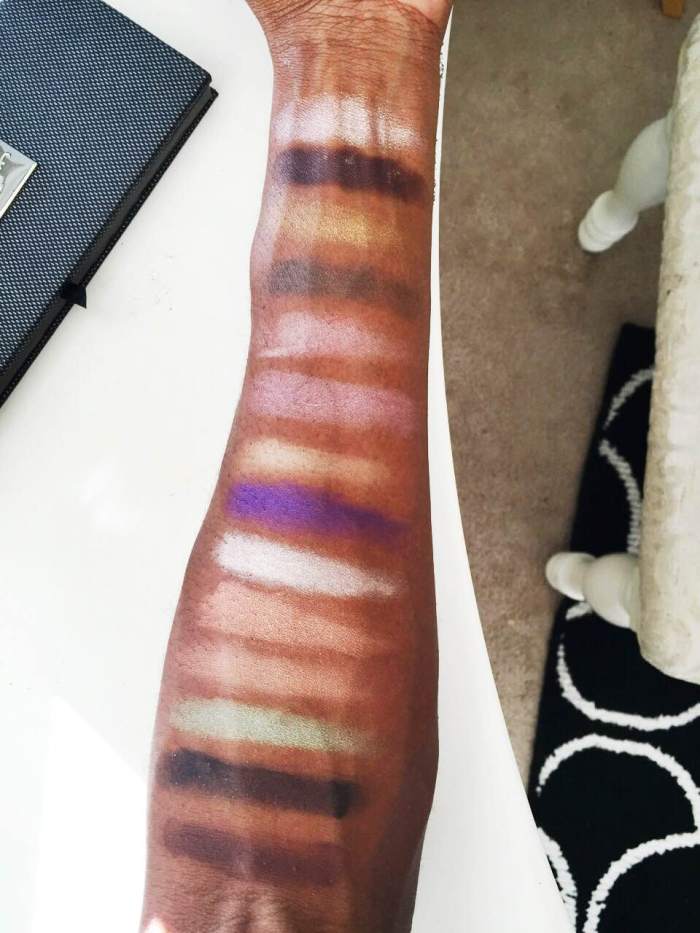
One of the many reasons why I love this palette so much is that it is great for individuals of color. It is obviously great for anyone with a lighter to medium skin tone; however I have found it rather difficult to find palettes with great transition shades for darker skin in the past. With this palette, I don’t have that issue (hot chocolate is EVERYTHING).
Tutorial featuring the Anastasia Beverly Hills Palette
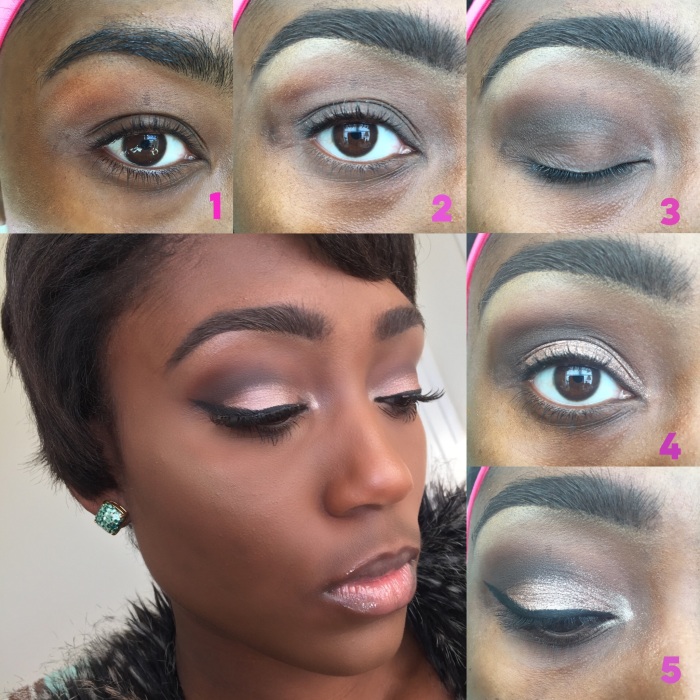
The feature of this look is the Anastasia Beverly Hills (ABH) ‘Self Made’ palette. Colors used are pink champagne, down brown (MAC), hot chocolate, and treasure. The soft warm tones look sweet on the crease while the metallic touch on the lid adds a little somethin’ somethin’. Bold lashes elevate the look for just about any occasion. Hope you enjoy my photo tutorial! Stay tuned for future looks. Follow me on Instagram for more beauty-related posts!
PRODUCTS USED:
- ABH ‘Self Made’ eyeshadow in Hot chocolate
- ABH ‘Self Made’ eyeshadow in Pink Champagne
- ABH ‘Self Made’ eyeshadow in Treasure
- MAC eyeshadow in Down Brown
- ABH DipBrow Pomade in Chocolate
- Makeup Forever Ultra HD Liquid Foundation in 180 or R530
- NYX Above and Beyond Full Coverage Concealer in Tan
- L’OREAL Paris True Match Super-blendable Concealer in Medium-Deep C6-7-8
- NARS Creamy Radient Concealer in Dark 1 Cafe
- Urban Decay All Nighter Long-Lasting Makeup Setting Spray
- Smashbox Photo Finish Foundation Primer
- Urban Decay NAKED Illuminated Shimmering Powder for Face and Body in Lit
- Becca Shimmering Skin Perfecter Pressed in Champagne Pop
- Marc Jacobs Highliner Gel Crayon Eyeliner in Brown Out
- Ben Nye Luxury Powder in Banana
- Maybelline New York the Rocket Volum’ Express Mascara in Blackest Black
- DUO Eyelash Adhesive in Clear-White (purchase at local drugstore or Sephora)
- Ardell Profession False Eyelashes in the style Edgy (purchase at local drugstore or hair shop)
- NAKED Urban Decay Lipgloss in Walk of Shame
- Maybelline New York Babylips in Minty Sheer
- Mark Juicy Gems in Sparkly Peach
Brushes and Tools Used:
- Sigma Eye Shading- E55
- Sigma Tapered Blending-E40
- Sigma Small Tapered Blending-E45
- MAC Powder Brush- 150
- Mikasa Concealer Brush- E220
- BHcosmestics Spoolie Brush
- BHcosmetics Fan Brush
- Pro Flat Definer Brush
- Pro Precision Eyeliner Brush
- Pink Beauty Blender


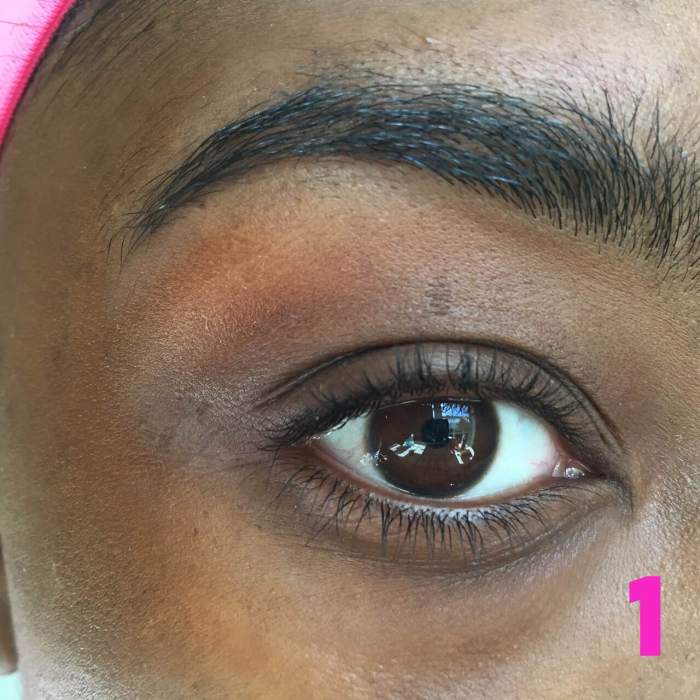
Step 1: Prime the eyes
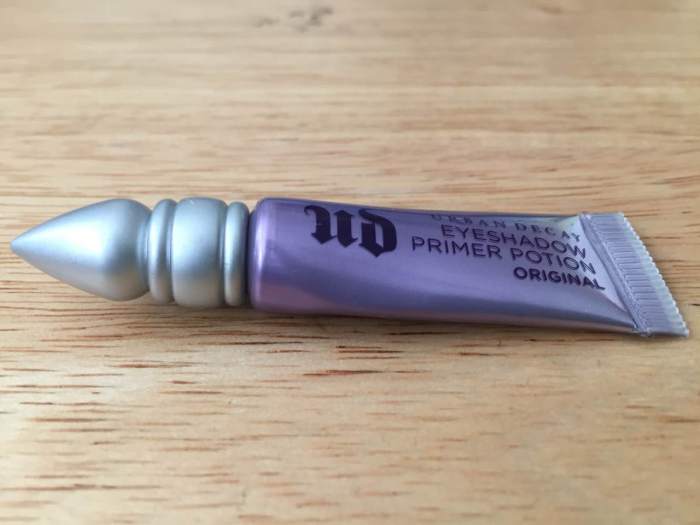
Use Urban Decay’s Primer potion in Original. It has been my tried and true for as long as I can remember. Simply use your fingers to apply the product to your upper and lower lash lines for longevity and more opaqueness of the shadows on your lid.
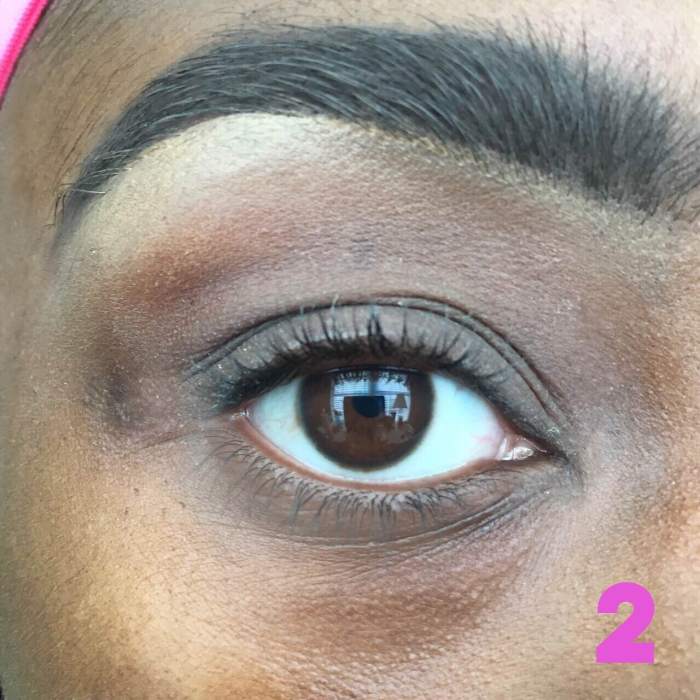
Step 2: The Transition Color
To get that professional makeup artist gradient-like effect on your lid, a transition color is essential and the first color you apply to your lid (unless you apply a stark white to the lid for even more opaqueness and to cancel out any discoloration or veins on the lids-generally more for bright colors like blues or yellows).
I like to use ‘hot chocolate’ in the palette to set the ground work for the other colors I layer on top. I use my Sigma E40 brush and apply the color in a sweeping motion in the crease.
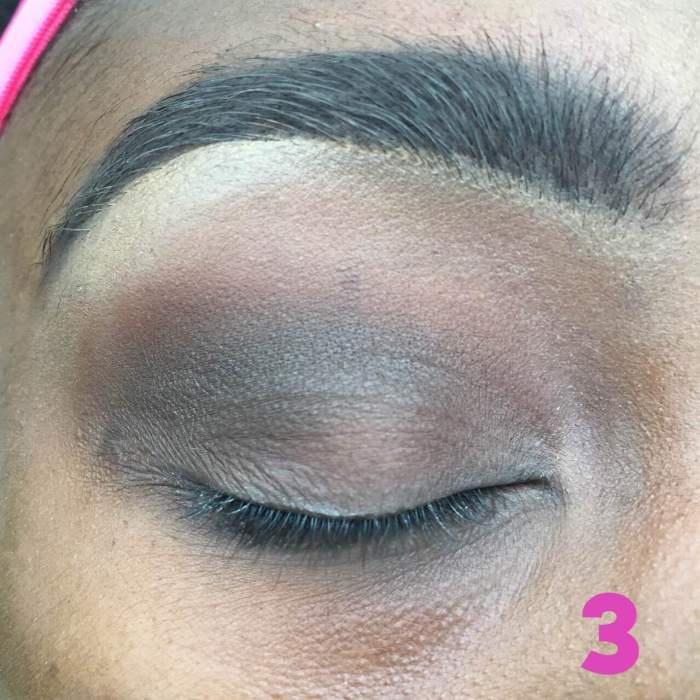
Step 3: Creating more Depth in Outer “V”
To create more depth or “shadow” on the lid, you want to take a small tapered blending brush like the Sigma E45 and place a deeper color like MAC’s ‘down brown’ to the outer “V” of the eye (this is the outer most portion of your eyelid). Apply the color in a patting motion, at first. Once most of the color is distributed from the brush to the outer v, begin a swiping motion with the brush, but only taking the color to the middle of the crease and bringing the color to the middle of your lash line (where you would apply eyeliner). Remember to stay consistent with the “V” shape.
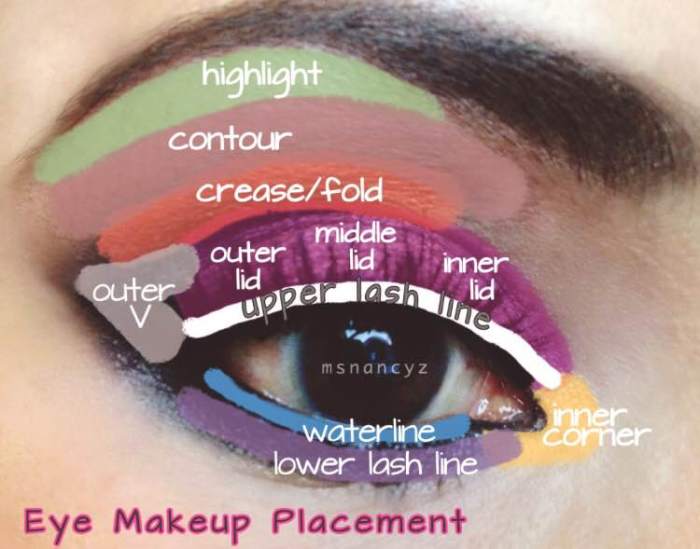


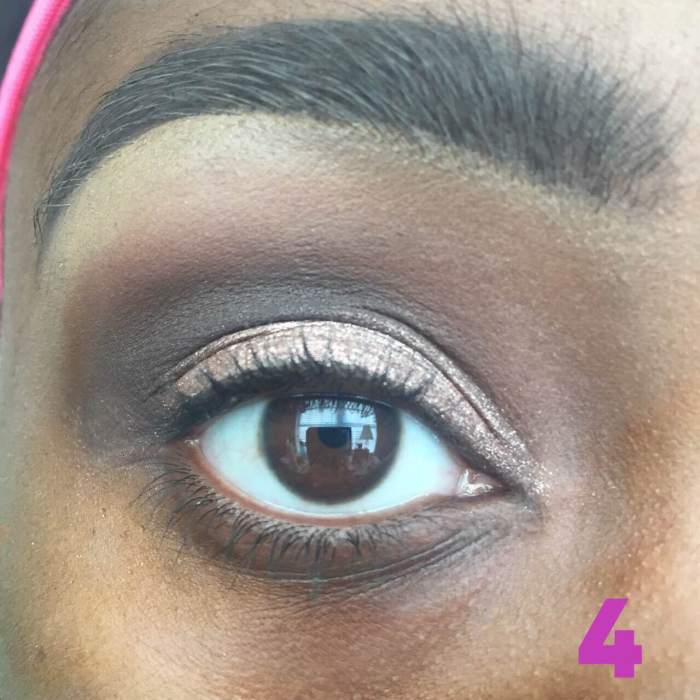
Step 4: Inner and Middle lid color
Two-thirds of your lid should be covered by the colors ‘down brown’ and ‘hot chocolate’ it’s time to add the inner and middle lid color. First, wet a shader brush, similar to Sigma’s E55 brush, with water or setting spray like Urban Decay’s All Nighter Spray. This technique is used so that once the shadow color is picked up and applied, it created more of a metallic look versus applying the shadow dry. It just gives a greater brilliance while on the lid.
Take the color ‘pink champagne’ and apply it on the rest of your lid (inner and middle and a part of the outer. You then want to go back in with ‘hot chocolate’ and a small tapered blending brush to blend out any harsh lines from application of ‘pink champagne.’
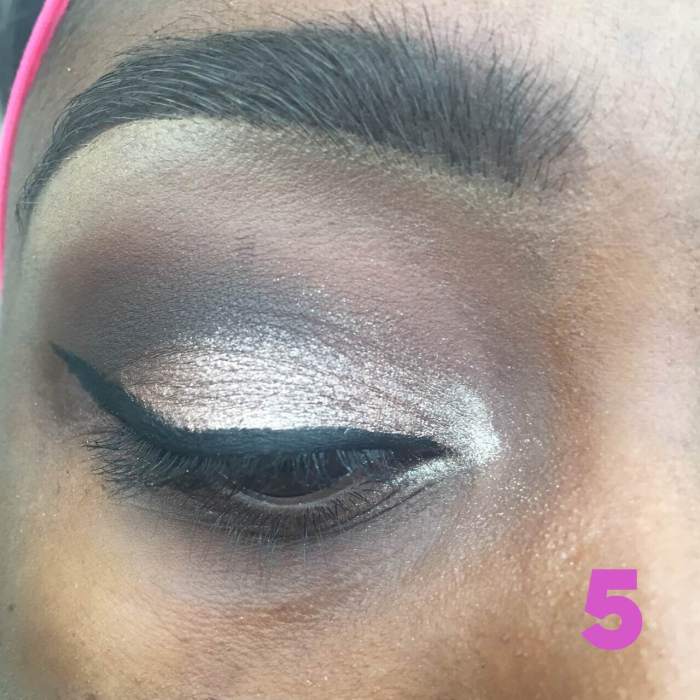
Step 5: Finishing Touches
Finish this look off with some liner and false eyelashes!
There you have it, folks! This look can be worn on an everyday basis or for a special occasion! There are an infinite amount of looks that can be created with this palette. Stay tuned for more looks from this palette!
Dont forget to follow my blog and check out my Instagram (@kiarajallen). What’s your favorite makeup palette? Leave a comment and let me know!
Hi I’m new to blogging and I would love if you could subscribe !
LikeLike
Hi Candice!
I have followed your blog! Keep up the good work!
LikeLike
This palette is so gorgeous! Love your makeup look ❤
LikeLike
Thank you, Arielle!
LikeLike
these shades are gorgeous! the pink champagne color is so pretty and unique 🙂
thesartorialcoquette.com
Instagram: the_ch1ara
LikeLike
Thank you!
LikeLike
Love this look 🙂
https://bloomify.wordpress.com/
LikeLike
Thanks, Bloomify!
LikeLiked by 1 person